What is amas?
The amas app is a paperless teacher assistant, an Android app that is optimized for operation on a tablet.
Download the detailed amas documentation.
The first school year with amas
You have successfully installed amas on your Android tablet and want to set up your first school year.
We will now go through this process as an example for the school year 2020/2021.
- Step 1: Set up school subjects
- Step 2: Set up study groups
- Step 3: Set up a timetable
- Step 4: Collect vacation days manually or import them automatically
- Step 5: Collect student data manually or import them automatically
Step 1: Set up school subjects
Navigate as follows: Administration > Add subject
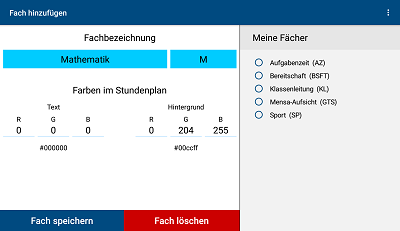
Please note that each abbreviation can only be used once.
For a clearer presentation in the timetable, you can design the individual subjects in different colors under „Colors in the timetable”.
Here you can see the „subjects” task time (TT), readiness duty (RD), etc. as already set up.
IMPORTANT :
If you want to delete a subject, please note that all data associated with this subject (e.g. all study groups for this subject) will also be deleted.
Step 2: Set up study groups
Navigate as follows: Administration > Add study group
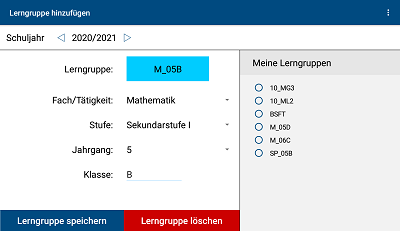
Then use the arrow keys ◁ bzw. ▷ to navigate to the correct school year. Then select subject/activity, level, year and class.
The result in the example is then class 5B in mathematics, which you will later see in amas with the designation M_05B.
Here you can see the learning groups 10_MG3, 10_ML2, etc. as already been set up.
IMPORTANT :
If you want to delete a learning group, please note that all data associated with this learning group (e.g. all timetable assignments, photo lists of this learning group) will also be deleted.
Step 3: Set up a timetable
Navigate as follows: Administration > Organize timetable
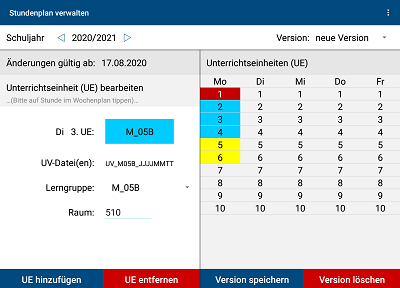
Then use the arrow keys ◁ bzw. ▷ to navigate to the correct school year and enter the date from which the new timetable will apply.
Then tap on the teaching unit (UE) in the timetable on the right that you would like to occupy with a study group (in the example: Tuesday 3rd UE) and enter the relevant data in the left area. After you press „Add UE”, class 5B in mathematics appears as 3rd UE on Tuesdays (unsaved).
Here you can see Monday already set up in the timetable.
To complete your entries, please click on „Save version” to save the timetable in the specified version (in the example: August 17th, 2020).
IMPORTANT :
It is not possible to save the timetable without specifying a „valid from” date.
Step 4: Collect vacation days manually or import them automatically
Navigate as follows: Administration > Organize Holidays
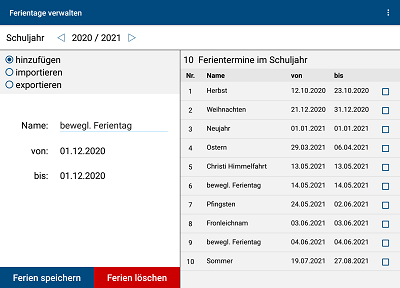
Then use the arrow keys ◁ bzw. ▷ to navigate to the correct school year. Then choose a name and enter the beginning and end of the vacation in question.
After saving, the new vacation days (in the example: the flexible vacation day on December 1, 2020) appear in the chronologically ordered list on the right.
Alternative to manual input:
You can also store all required holiday dates in amas „in one go”.
For this purpose you can use the „import” function.
Step 5: Collect student data manually or import them automatically
Navigate as follows: Administration > Organize student data
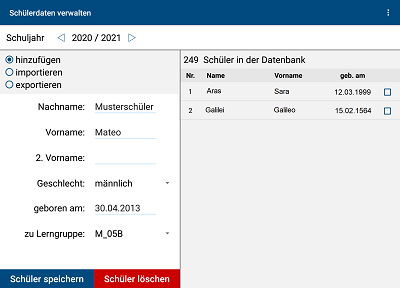
Then use the arrow keys ◁ bzw. ▷ to navigate to the correct school year. Then enter the data in the left area.
After saving, the data of the new student (in the example: Mateo sample student, born on April 30th, 2013, student of learning group M_5B) appear in the alphabetically ordered list on the right.
Alternative to manual input:
You can also store all required student data in amas „in one go”.
For this purpose you can use the „import” function.
After completing steps 1 ‒ 5, the following amas functions are available to you in everyday school life for all your learning groups (are constantly being further developed):
Detailed descriptions can be found in the chapter „Working with amas” .
Working with amas
Lesson preparation
Foto lists
Documents
Calendar Learning Tests
Notices
Administration
.gif)


